Download plan as PDF
| Name of the lesson | How to use geometric shapes to create cubist artwork | ||||||||
|---|---|---|---|---|---|---|---|---|---|
| Target group | 8-10 years old | ||||||||
| Duration | 2 lesson of 40 minutes | ||||||||
| STEAM Skills/ 21st Century Skills?? |

Collaboration Creative Thinking |
||||||||
| Expected learning outcomes |
At the end of the lesson unit, students will be able to: |
||||||||
| Subjects and topics covered |
Mathematics: - Introduction to geometrical shapes; sides, corners and angles of 2D shapes Arts: - Introduction to Cubism |
||||||||
| Methodologies |
Design Thinking |
||||||||
| Integration of the Arts |
The unit covers the creation of a cubist design. This allows the students to identify the differences and correlations of a variety of geometrical shapes in a hands-on and visual approach. Students will be asked to carry out a basic analysis of their artwork, and to compare and contrast with the work of their peers. They will also be encouraged to exchange ideas and other feedback on each other’s artwork. Based on the Design Thinking approach, this unit will cover the following stages: discover, interpret, ideate and prototype |
||||||||
| Learning Environment |
Clasroom |
||||||||
| Required resources |
Cardboard in all shapes and sizes (e.g. boxes, rolls, etc.), glue, colour pencils. Sheets of A4 paper. |
||||||||
| Prior knowledge a. teacher b. students |
To prepare for the lesson, be sure you review the basic concepts of Cubism and familiarise yourself with some prominent paintings, especially those making a prominent use of geometrical shapes. Take a look at artwork by contemporary artists such as Romero Britto, who combine Cubism with Pop Art. There is no specific preparatory work required for students. They will need to be able to draw and colour in basic animals’ shapes, cut out cardboard and glue pieces together. There will be phases of individual and group work, so that communication and social skills will be enhanced. |
||||||||
| Detailed description of the step-by-step sequences of the unit, incl. specific activities to support the learning experience |
STEP 1: discover 1. Ask the students to draw an animal on an A4 sheet of paper (10 mins). Ask students to use any colour except for black. The outline of the animal should come as close to the edges as possible, so that the whole sheet is nearly filled with the drawing. Ensure that prominent details are rendered in the drawings, e.g. face, legs, paws, wings, beaks, tongues, tails, fins, etc. To review progress, you can ask learners to hold up their sheet of paper when they think they have made progress or finished, or when they have a specific question. Provide constructive feedback and encourage your students to add plenty of details. Example: 
2. Explain basic geometric shapes (15 mins) Ask students to put their drawings to one side. On the board, show basic geometric shapes, and ask students what they may have in common, and how they differ from each other. Solicit answers so as to lead them to understand the concept of corners, angles and sides. 3. Creating and using stencils for each shape (20 mins) Once students have created their stencils, they use it to outline them over the original drawing using a black pen, thus segmenting the drawn animal in various geometrical shapes. The students will then colour in the various segments, using different colours. Example: 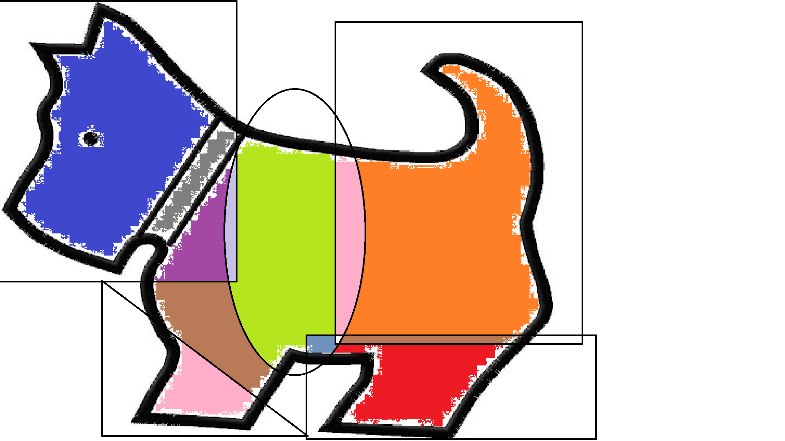
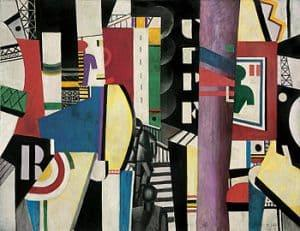
STEP 2: interpret 1. Show the students examples of famous cubist paintings (10 mins). Select paintings where the use of geometric overlays is prominent, for example:
2. Ask students to identify geometric shapes in each painting, introduce the concept of regular and irregular shapes. In the painting by Britto, the various segments have been coloured in a variety of colours and patterns. In the paintings by Gris and Léger, it is as if the segments have also been re-arranged, thereby creating a surreal image. Ask your students to recognise which objects might have been cut and re-arranged differently. In Popova’s painting, on the other hand, it is as if a multitude of objects have been placed above the fruit bowl at the bottom of the image, creating a colourful and seemingly cluttered image, which makes it difficult to distinguish the two figures mentioned in the title. STEP 3: Ideate and Prototype 1. Students create their own Cubist artwork (25 mins) Ask students to cut along the black lines of their animal, which they have drawn with their stencils. Distribute a piece of cardboard of A4 size or larger to each student, and split them in groups of 3 or 4. Taking turn, students will re-arrange their cut-outs on the cardboard until they create a new, funny or interesting image. All group members are asked to provide ideas and feedback. Once all group members have reviewed their suggestion with their peers, distribute glue sticks so that the students can glue the segments on the cardboard, thereby creating a new image. |
||||||||
| Gender-inclusive strategies and activities planned |
When reviewing artwork by famous artists, make sure you include female artists as well. Avoid stereotypical representations of women in art (e.g. women as muses, for instance in some of Picasso’s work) and seek out female artists instead (such as Lyubov Popova, as shown above). When drawing and colouring in, allow students to express their personality, but do not suggest choices based on stereotypes (e.g. pink for girls). When forming groups, ensure there is an equal gender representation, as far as possible, so that the exchanges within the group contain diverse viewpoints. As far as possible, ensure that speaking time within the group is equally shared. |
||||||||
| Assessment & Evaluation |
Solicit oral feedback from students during the lesson, to assess their understanding and interest in the task. Provide constructive feedback and offer suggestions if they are stuck, without trying to doctor their work. Except for when you give instructions and for when you explain point 2, accept that art creation can be messy and noisy, as long as the students are on task. Compare the quantity and quality of the final output to identify which students may thrive more in such a creative environment, and which students may find it more difficult and why (e.g. need to improve some social skills, preference of a different learning method, etc.) |