Download plan as PDF
| Name of the lesson | OUR OWN HOVERCRAFT |
|---|---|
| Target group | 9-10 years old |
| Duration | 45 minutes |
| STEAM Skills/ 21st Century Skills?? |

Critical Thinking Communication Collaboration Creative Thinking Problem Solving |
| Expected learning outcomes |
By the end of this unit, learners will be able to:
|
| Subjects and topics covered |
Physics, arts In particular, through the activity, students:
In addition, thanks to this activity students may be able to get more interests in technical work and see that building and constructing is not very difficult and even they can do that by using simple materials. |
| Methodologies |
Design Thinking Inquiry based learning Problem based learning |
| Integration of the Arts |
Arts are integrated during the entire exercise, since students are engaged in the creation of manual objects, using creativity and imagination, as well as in the discovery of new materials and their properties. |
| Learning Environment |
Classroom |
| Required resources |
|
| Prior knowledge a. teacher b. students |
In order to deliver this lesson, the teacher will need to have the following knowledge and skills set:
In order to be able to participate and contribute to this lesson, the students will have achieved the following standards:
|
| Detailed description of the step-by-step sequences of the unit, incl. specific activities to support the learning experience |
STEP 1: What is friction? Exercise n.1: · Ask students to rub their hands together. Ask them what they experienced. What was the feeling? The answer is: warmth caused by friction. Friction occurs in everyday life situations: while walking we rub our feet on the floor, thanks to friction we do not stumble or fall, thanks to friction various vehicles move. The side effect of friction is warmth. · Ask students: So, what can happen to every vehicle during moving because of friction? What can happen to the vehicle components it is built of? The answer is: They can overheat during moving. · Ask students: What does prevent them from that? The answer is: Special materials they are built of. STEP 2: Friction of materials
Which surface was easier to move on the floor? Why was it like that? The answer is: Blanket, because it produces less friction than the rubber (example: rubber soles of shoes have been designed to not to slip on a slippery surfaces). STEP 3: Discussion Start a discussion with students: “Let’s imagine that blanket and the rubber linen were examples of two vehicles. Both of them had to move on the same surfaces which were: ground, sand, water, ice, snow. One of them can’t do that because it will produce too much friction and will overheat or will sink under the water, but the other one can move on each of those surfaces. How do you think – what kind of the vehicle can do that? The answer is: the hovercraft STEP 4: Hovercraft features · Explain children how hovercraft is constructed. You can play a video: https://www.youtube.com/watch?v=2y7Pdxcyql0 – ENG longer version https://www.youtube.com/watch?v=moahMIqaek0 – ENG shorter version (1) https://www.youtube.com/watch?v=W2r6Sqibdfo – ENG shorter version (2) · Ask a question: What are the features of the hovercraft which allows it to move on so many different surfaces without creating too much friction? Answers:
STEP 5: Building your own hovercraft (you can find pictures in Annexes)
YOUR HOVERCRAFT IS READY! Now to let it work, open the movable part of the cap. The escaping air is put under the CD so it created an airbag. Thanks to that the hovercraft can move easily on the table or floor surface without creating a friction. Under the template you can find some pictures presenting following steps of creating the hovercraft. |
| Gender-inclusive strategies and activities planned |
Both boys and girls participate in they activity: they discuss about the topics presented by the teacher, take part in the activity with blankets and rubber linings and finally, they build their own hovercraft. |
| Assessment & Evaluation |
Assessment and Evaluation of students (by the teachers) will be based on the monitoring of the acquired skills: - Intuition - Creativity and Imagination: students develop creativity and problem-solving skills and train spatial imagination - Problem Solving: the students describe the advantages and disadvantages of a hovercraft, while analysing the causes and the effects - Inquiry: the students conduct experiments related to friction |
| Annexes |
For further information: https://www.youtube.com/watch?v=2y7Pdxcyql0 – ENG longer version https://www.youtube.com/watch?v=moahMIqaek0 – ENG shorter version (1) https://www.youtube.com/watch?v=W2r6Sqibdfo – ENG shorter version (2) Activity pictures STEP 1. 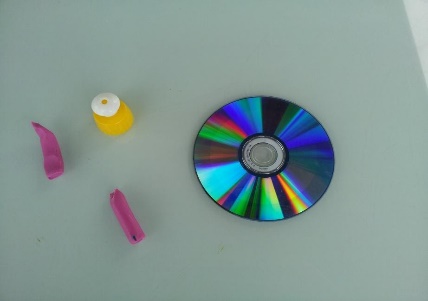
STEP 2. 
STEP 3. 
STEP 4. 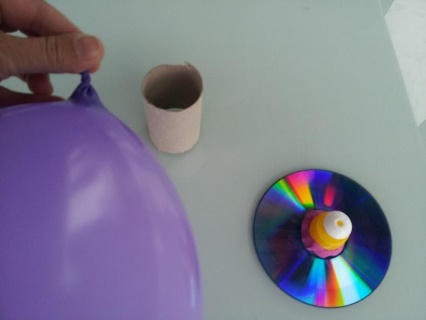
STEP 5. 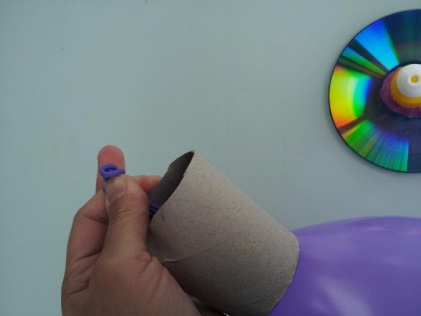
STEP 6. 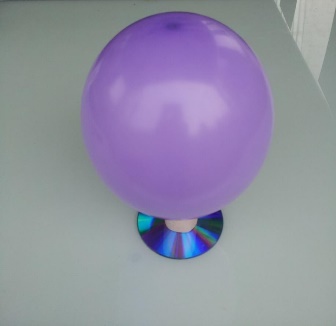
|